By Seren Charrington Hollins 
Kombucha is the beverage the ancient Chinese called the “Immortal Health Elixir”. It’s been around for more than 2,000 years and whilst this drink comes with a long list of potential health benefits, I must confess that on first sight it is a little scary. The first time I ever saw Kombucha brewing was when I paid my friend Layla a visit and next to her kettle was a large jar with what I thought looked like some sort of alien fungi floating in dirty dishwater, when I asked what this dubious looking jar was she laughed and said, ‘’it’s a Kombucha plant my friend gave me, but I can’t bring myself to drink it and haven’t the heart to kill it either’’. I must confess that it took a few years from my first sight of Kombucha to get into this form of fermentation.
Kombucha is made from sweetened tea that’s been fermented by a symbiotic colony of bacteria and yeast known commonly as a SCOBY, but referred to by some as the “mother” because of its ability to reproduce, or a “mushroom” because of its appearance. The SCOBY bacteria and yeast eat most of the sugar in the tea, transforming the tea into a refreshingly effervescent, slightly tart, fermented (but mostly non-alcoholic) beverage that is relatively low in calories and sugar.
Before starting my Kombucha brewing journey I had read up on the health benefits of this elixir and came to understand that it contains glucosamines that are important in maintaining joint health as well as being a probiotic beverage that has a myriad of benefits including aiding digestion and boosting the immune system. However, Kombucha’s greatest health benefits are held in its ability to detox the body. Not only is it rich in many of the enzymes and bacterial acids your body produces and uses to detox your system, thus reducing the strain on your pancreatic load and easing the burden on your liver; but it is also very high in Glucaric acid, and recent studies have linked to helping reduce the risk of developing cancer and other diseases. At the time of ordering my first SCOBY I was feeling that a bit of detox was in order and so I decided to give it a go. The SCOBY arrived in the morning post in its sealed package of brown liquid. When I opened the package and removed this rubbery, spongy culture I began to wonder what I had let myself in for. I brushed aside my squeamish apprehension and I am glad I did because from my very first taste of my home brewed Kombucha I was hooked on the process and now have three SCOBIES brewing away happily.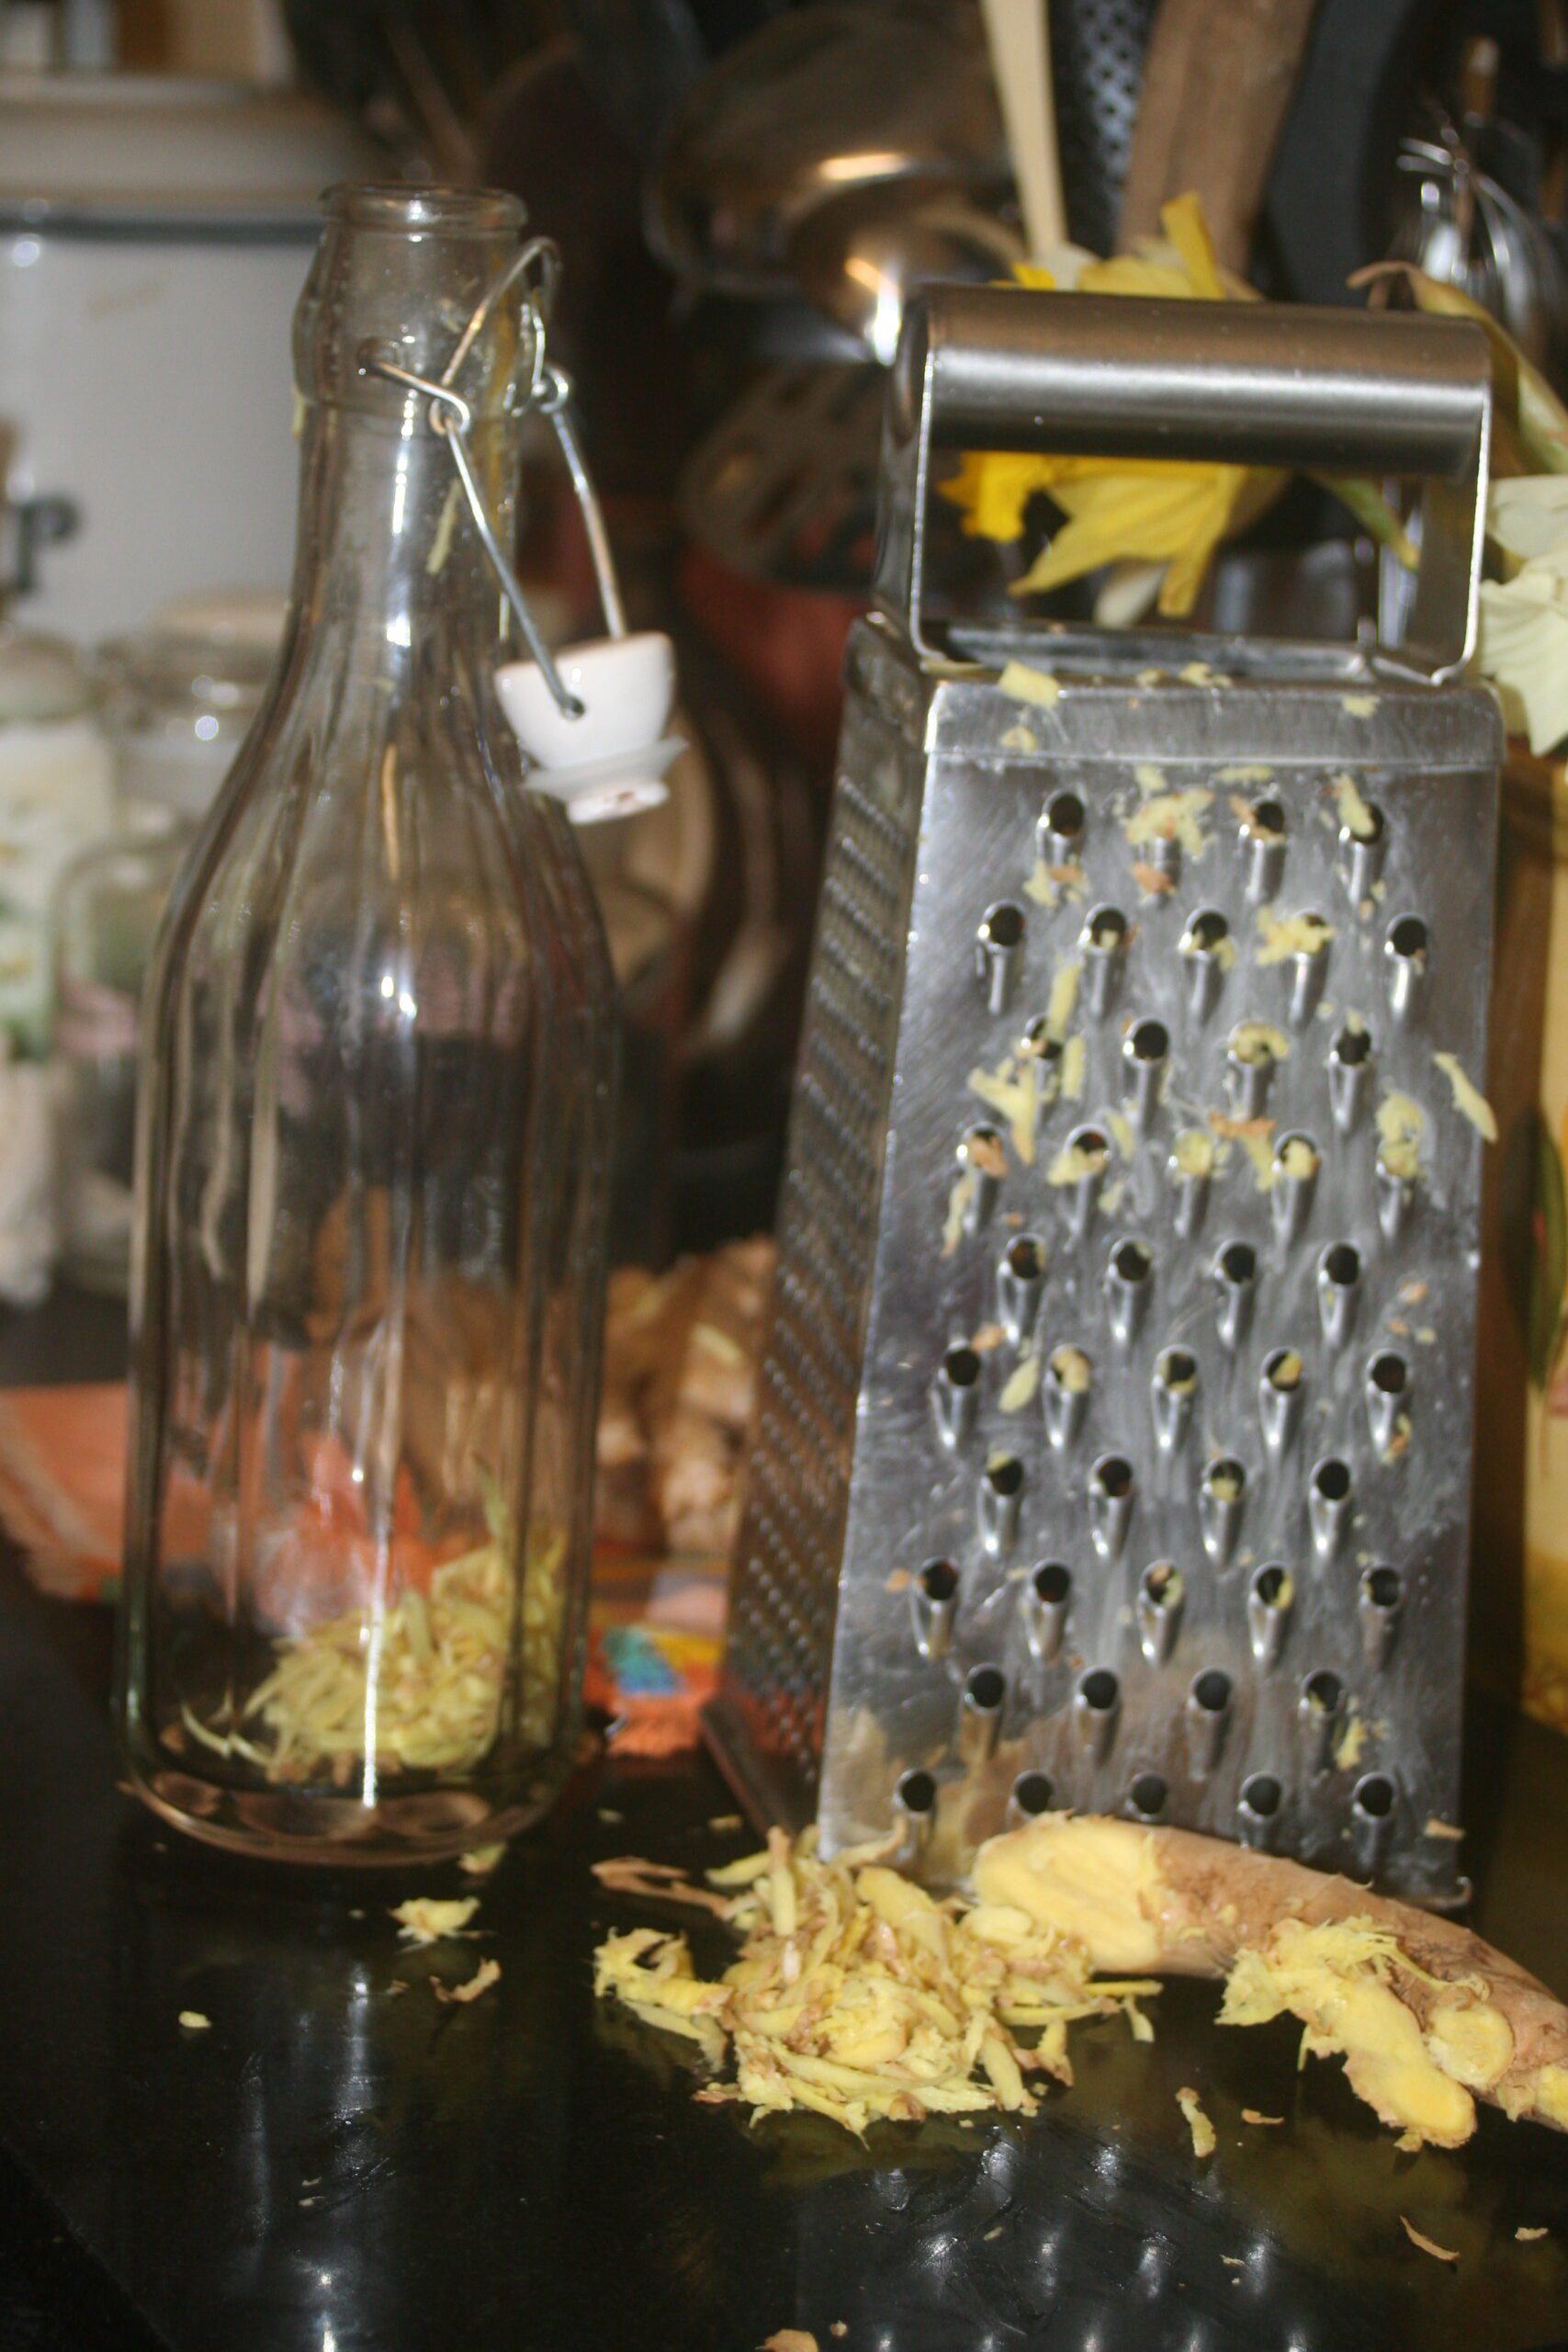
To Make your First Batch of Kombucha you will need:
A Kombucha SCOBY
A glass container or jar of some description. I find a Kilner style jars that holds approx. 2 litres ideal.
6 Tea bags – I use a simple black organic tea, but whatever type of tea you are using it is imperative that all brewing is done using a base of ‘real’ tea, be it green, black, white etc. Do not use teas with added oil such as Earl Grey.
200g Sugar – granulated.
2 tablespoons of cider vinegar
A tight weaved cotton or muslin cloth and elastic band to cover your jar (this is important as fruit flies love the smell of the brewing Kombucha and can appear from nowhere)
Kombucha brews best at a constant room temperature of approx 20-23C (70F) making an airing Cupboard or similar ideal.
A Note on Cleanliness:
Make sure everything is very clean when handling Kombucha. It’s a living culture, a complex system of bacteria and yeasts and you don’t want to risk contaminating it. Use freshly cleaned hands, clean, sterilised jars and clean non-metallic implements.
Directions:
- The naming of the SCOBY. Now in households where there are not young children this stage can be skipped, but giving your SCOBY a name helps to remind you that this is a living organism and needs to be treated with respect. My first SCOBY is called Keith after my tea drinking Dad (the children’s idea not mine, honest!)
- Make the Tea Base: Boil one litre of water in a large saucepan. Put six tea bags into your pan of boiling water, add 200 grams of sugar and stir until the sugar has dissolved. Allow it to steep until the water has cooled. This can take a few hours.
Do not be tempted to pop your tea in an ice bath, fridge or freezer to speed up the cooling process as the tea should be cool but not ice cold.
- Add the Starter Tea: Once the tea is cool, remove the tea bags and transfer the sweetened tea to your glass container. Stir in the starter tea. (The starter tea makes the liquid acidic, which prevents unfriendly bacteria from taking up residence in the first few days of fermentation. For your first batch of Kombucha use 2 tablespoons of cider vinegar for subsequent batches you can use 200 ml of Kombucha from a previous batch as a starter.
- Add the Scoby: gently slide the SCOBY (the lightest side upwards, if you can see a difference) into the jar with well-scrubbed, clean hands. The SCOBY will float, sink or suspend itself somewhere in between: these are all good signs. Cover the mouth of the jar with a few layers of muslin and secure with a rubber band.
- A Home for SCOBY: find a spot for your container; this should be somewhere out of direct sunlight but in a room of a relatively balanced temperature. It is important to ensure that the spot you choose will allow the jar to remain undisturbed.
- Ferment for 7 to 14 Days: checking the kombucha and the scoby periodically.
Take a look at the darkness of the tea when you first put your Kombucha culture into it, then note how the liquid changes colour over the passing days. The colour will change, to a degree, and the liquid will become slightly cloudier. After seven days pour a very small amount into a glass and have a sip. If the brew tastes fruity and not tea like, it’s ready, if not, leave it another day and try again. The Kombucha should be a balance of sweet and tart. As you get more experienced you will come to learn the brew duration that best suits your palette.
- Remove the SCOBY: Before proceeding, prepare and cool another pot of strong tea for your next batch of Kombucha. With clean hands, gently lift the SCOBY out of the Kombucha and set it on a clean plate. As you do, check it over and remove the bottom layer if the SCOBY is getting very thick.
- Bottling: Pour the fermented Kombucha (straining, if desired) into bottles using the small funnel, along with any juice, herbs, or fruit you may want to use as flavouring (see the recipes below). Leave about a half inch of head room in each bottle. Refrigerate. The longer you leave your bottled Kombucha in the fridge, the fizzier it will get; I usually leave mine between one and three days and it is advisable to drink it within one month.
*remember to retain 200ml of this brew as a starter for the next batch.
- Make your next batch: begin the process all over again this time using your retained brew as the starter instead of cider vinegar.
Tips and Hints:
It’s not unusual for the SCOBY to float at the top, bottom, or even sideways.
A new cream-coloured layer of SCOBY should start forming on the surface of the Kombucha within a few days. This usually attaches to the old SCOBY, but it’s ok if they separate.
The SCOBY will grow with each brew, gradually getting thicker. You can leave them like this and occasionally peel of a layer from the bottom and discard it. Or you can separate them and either pass the new SCOBY on to a friend or start your own Kombucha ‘farm’ with several batches brewing simultaneously.
You may see brown stringy bits floating beneath the SCOBY, sediment collecting at the bottom, and bubbles collecting around the SCOBY – these are all normal and signs of healthy fermentation.
Recipe for Flavoured Kombucha
Ginger Zinger
My favourite way of flavouring Kombucha is with fresh ginger, it’s really refreshing and a great pick-me up drink.
Ingredients:
Freshly brewed Kombucha
Glass Swing top bottles (sterilised)
Fresh root ginger (1 grated tsp. per bottle)
Method
Scrub the ginger clean, but don’t bother peeling it and then grate it finely .
Place 1 teaspoon of grated ginger in each bottle.
Pour the fermented Kombucha (straining, if desired) into the bottles using a small funnel. Leave about an inch of head room in each bottle. Store the bottled Kombucha at room-temperature out of direct sunlight and allow 2 days for the Kombucha to secondary ferment.
After two days refrigerate the kombucha for at least 4 hours to chill it down. The Kombucha will keep in the refrigerator for several weeks. If desired, strain the Kombucha as you serve it to catch any bits of ginger pulp.
Top Tip
Use your plain brewed Kombucha as a natural pesticide, I place Kombucha in a spray bottle and use it to deter ants and green fly.
Fruity Kombucha
If you don’t care about fizz and want to enjoy it sooner than later, puree or mash some berries, stir it into to your brewed Kombucha and enjoy right away (this is by far the sweetest option). If you want a fizzy drink that is a little less sweet, then add the fruit for a second fermentation as detailed in the recipe below.
Raspberry Kombucha
I find that raspberries are particularly delicious in this recipe, but blueberries also work. This recipe is a favourite with my children as they get to devour the remainder of the punnet of raspberries also like the fizzy drink that results from it.
Ingredients:
Freshly brewed Kombucha
Glass Swing top bottles (sterilised)
15 firm raspberries (frozen or fresh)
Method
Place the raspberries in the sterilised bottle. Fresh or frozen raspberries can be used in this recipe and if using frozen raspberries then place them in the bottle whilst still frozen.
Pour the fermented Kombucha into the bottle using a small funnel. Leave about an inch of head room in each bottle. Store the bottled Kombucha at room-temperature out of direct sunlight and allow 2 days for the Kombucha to secondary ferment.
After two days refrigerate the Kombucha for at least 4 hours . The raspberry Kombucha will keep in the refrigerator for a week.
Kombucha Salad Dressing
If you want a quick and easy salad dressing, then simply combine 1 tbsp. fermented Kombucha, with3 tbsp. of olive oil and season to taste with salt and freshly ground black pepper. Whisk together and adjust seasoning accordingly. This is a quick and easy salad dressing that provides an alternative use for Kombucha.
I hope that you will soon discover the fabulous joy of fermenting your very own probiotic- rich Kombucha tea, but be warned this fermenting malarkey is addictive!
It is important not to expose your SCOBY to contact with metals as it will weaken the SCOBY an taint the Kombucha. drink
Avoid using metal implements:
You do not need to worry about metal kettles or saucepans used to boil the water and you can use a metal teaspoon to stir your tea, but use plastic utensils whenever you come into contact with the Kombucha.
Word of Warning
If you are a diabetic you must NOT drink Kombucha without seeking the opinion of your doctor, and if you are on any heavy medication, it might be best to seek professional medical advice on whether Kombucha is suitable for you to drink.
